Hello everybody, it is me again, Dan, welcome to my recipe page. Today, we’re going to prepare a distinctive dish, brazilian cheese bread (pão de queijo) 🇧🇷. One of my favorites food recipes. For mine, I am going to make it a little bit tasty. This will be really delicious.
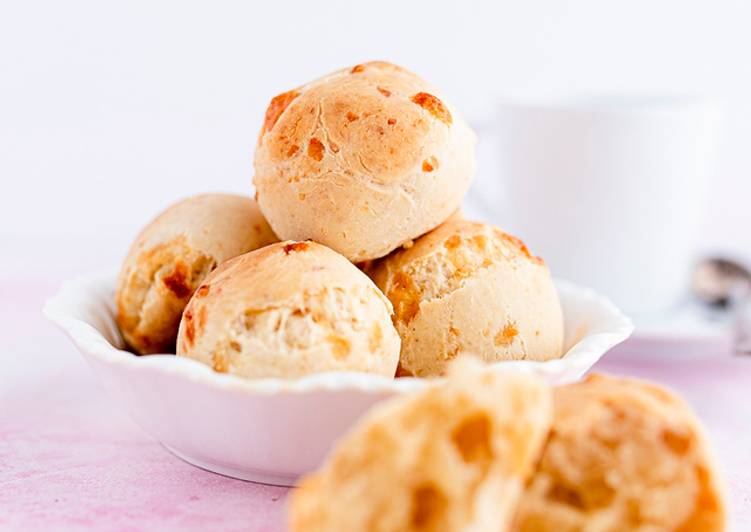
Brazilian Cheese Bread (Pão de queijo) 🇧🇷 is one of the most favored of recent trending foods on earth. It is simple, it is fast, it tastes yummy. It’s appreciated by millions daily. Brazilian Cheese Bread (Pão de queijo) 🇧🇷 is something that I’ve loved my whole life. They are nice and they look wonderful.
Pour olive oil, water, milk, and salt into a large saucepan, and place over high heat. When the mixture comes to a boil, remove from heat immediately, and stir in tapioca flour and garlic until smooth. After posting the moqueca recipe, several of you asked if I had a recipe for Pão de Queijo, or Brazilian cheese bread, sort of like a chewy cheese puff made with tapioca flour. As a matter of fact, I do!
To get started with this recipe, we must first prepare a few components. You can have brazilian cheese bread (pão de queijo) 🇧🇷 using 8 ingredients and 9 steps. Here is how you cook it.
The ingredients needed to make Brazilian Cheese Bread (Pão de queijo) 🇧🇷:
- Prepare 500 g Tapioca starch (the fine and light kind)
- Make ready 5 g salt
- Prepare 30 g unsalted butter
- Get 60 ml vegetable oil
- Get 250 ml full fat milk
- Prepare 2 large eggs
- Prepare 150 g grated medium cheddar
- Make ready 150 g parmesan cheese or similar
Brazilian Cheese Rolls (Pão de Queijo) at Home! Elise of Simply Recipes posted her Pão de Queijo recipe, I was so excited to finally make my own Brazilian Cheese Bread but I was pregnant then and followed a very strict diet that precluded me from eating cheese. Anyway, time flies and now that Baby G is here, I am sort of on a cheese binge these days. Pão de queijo are traditional Brazilian rolls made using a classic French pâte à choux dough.
Steps to make Brazilian Cheese Bread (Pão de queijo) 🇧🇷:
- In a saucepan, bring the milk, oil and butter to boiling point. Take off from the heat and set aside.
- In a large bowl, mix the tapioca starch and the salt. Pour the milk bit by bit, mixing with a wooden spoon.
- Add the eggs and knead with your hands until it's incorporated. The dough should not be hot, only warm to the touch.
- Add the cheese and keep kneading until the dough is soft and not sticky.
- Pre heat the oven at 180 degrees.
- Make little balls, around 30/34 grams each.
- Place in a tray, around 1 cm apart for them to expand while cooking.
- Leave them to cook for around 20 minutes or until they are light brown.
- If you want, after making the balls, you can freeze them. They will cook straight away from the freezer. To freeze: Place them on a tray, apart, so they don't stick together, it is hard to separate them once they are frozen. Cover with cling film and leave to freeze for at least 12 hrs. Once they are frozen, you can transfer them to a container, they won't stick anymore at this point. The cheese bread lasts up to 3 months in a sealed container, in the freezer.
Anyway, time flies and now that Baby G is here, I am sort of on a cheese binge these days. Pão de queijo are traditional Brazilian rolls made using a classic French pâte à choux dough. Pâte à choux is a dough base used for both sweet (éclairs, profiteroles) and savory (Parisian gnocchi, gougères) items. Brazilian cheese bread, or pão de queijo as we call them in Portuguese, are a true gift to the universe! This typical Brazilian snack is lightly crunchy on the outside, soft and chewy on the inside, and has a cheese flavor that just hugs your mouth.
So that’s going to wrap it up for this special food brazilian cheese bread (pão de queijo) 🇧🇷 recipe. Thank you very much for reading. I’m confident you can make this at home. There is gonna be more interesting food at home recipes coming up. Remember to bookmark this page on your browser, and share it to your family, colleague and friends. Thank you for reading. Go on get cooking!